Monday, April 05, 2010

What the Hell Am I Doing up at This Time? - The 4am Project

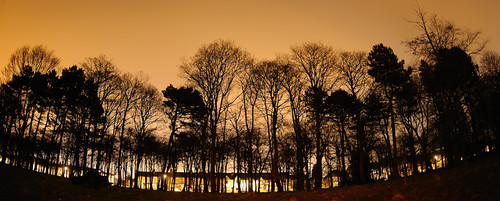
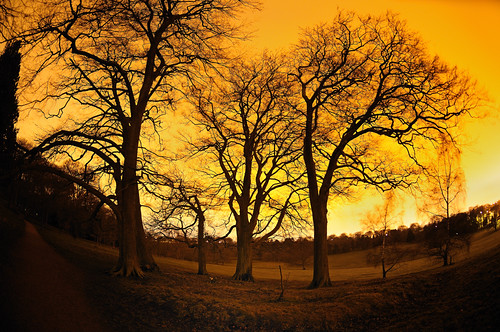
The 4am Project has just celebrated its first birthday, but this was the first time I got involved. It has been difficult to resist Karen Strunks' (The originator of the 4am Project) gentle stream of tweets over the last couple of months, so yesterday Easter Sunday (04.04) I was up at 3:30 in the morning planning to head out to take some photos. I had two plans for shooting, one was to head to Warley Woods (in Bearwood, near Birmingham, UK) with some flash guns to get some eerie shots of the canopy. The second plan was to find some empty crossroads to take some 360 degree panoramas. So with some trepidation - someone might call the police having seen strange lights in the night - I headed off to the woods.

4am: Hemmingway's Bench in Red

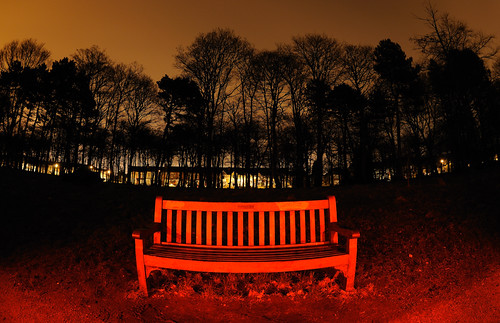
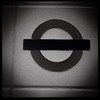
Even though I'd tested the slave cells and flash guns at home they just didn't work well in the field (or the woods). I guess it was the distance, the use of Nikon Creative Lighting system on only one gun, and the power of the flashes. With my plan not working, well, to plan, I quickly changed what I was shooting and how. This did not stop me getting some interesting shots handholding the flash and manually firing, since the shutter was open so long (it was dark in the woods) this was very possible. The picture of Hemmingway's Bench (above) is a good example of both changing subject and technique.

4am: Don't Stray From The Path!

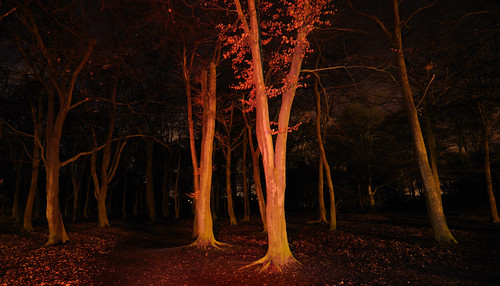
I was having so much creative fun in the dark, in the woods, that I never made it to my next project idea within in the 4am Project hour. This I'll save for next time, and there will be a next time for me. This is not because I've never tried night shooting - I have many images of empty urban streets from around Europe - but because 4am Project is something different. The real genius of the 4am Project is not Karen Strunks' realisation that Birmingham was somehow different and an interesting subject to photograph at 4am, but that everyone's local environment could be different at this (befuddling) time in the morning. To get photographers around the world out of bed, looking at, and shooting they're locale (let's face it no one will want to go far at 4am) is inspired, and, no doubt, a lot of hard work.

4am: Beyond the Trees, the Jungle

I had this comment on one of the images I posted on Flickr:

This was one of the first 4am shots I saw this morning. My first thought was: "why have I been freezing my arse off taking crap photos when real photographers are out there taking great pics like this?!" (andytoots)

And this was my response:

Many thanks [andytoots], but I'm also an amateur who froze his arse off (there were some pros out there as well)! For me 4am Project is about the collection of all the images taken by all the nutters (and insomniacs), even the ones of the alarm clocks. It's the world at a different time and that's what makes it inspirational - well for me anyway.

That was, and is, what 4am Project is really about: an open creative photographic challenge that is building a community who are looking at their world in different ways. There are some great imaginative images in the 4am Project Flickr group and some which are just what people see, but they are all important as they form part of an archive of a time we rarely willingly see.

4am: A False Dawn

I learn't a few things yesterday morning, and confirmed some others, about photographing digitally at night. Below are my tips for anyone wishing to get out there for the next 4am Project.

Lastly a massive thanks to Karen for her tireless effort to make me and many other photographers get out there and take pictures when the duvet is far more welcoming!

4am: Don't Stray from the Path III

Some brief tips for the next 4am Project outing

(Especially if you are going down to the woods!)

A tripod is often best

This is pretty essential, but it is possible to use small tripods like the Gorillapods to get interesting angles. If you don't have a tripod try making a small bean bag using lentils or rice in a cloth or strong plastic bag (The commercial version is The Pod) and this will allow you to keep your camera level and off the ground. Naturally you can up the ISO on your camera (or set it to auto) in well lit urban areas, but then you'll lose any streaks of lights from cars etc. and unless you have a Nikon D3 or D700 the images will have quite a lot of colour noise.

Have a torch (flashlight) handy

Even if you are in a well lit city centre a torch will allow you to check settings on your camera (especially on an DSLR) and if you are in a dark corner then it's essential.

Hotshoe spirit-level could be useful

Of course if you are shooting unusual angles then no need for one of these, but in the dark it is difficult to check if your camera is level (hotshoe required)

Use the self-timer or remote

Even on the tripod long exposures will suffer from blur if you press the shutter button or handle the camera. Using a self-timer also allows you to get your shadow out of shot if the lighting is coming from behind.

Charge your batteries

All of them! Long exposures, flash, bracketing exposures and shooting lots will run batteries down quickly. I had to use my back up camera battery part way through a set-up. If I didn't have the spare I would have missed my best shots.

Set focus to manual (if you can)

On autofocus the camera will spend most of it's time hunting for something to focus on. Setting it to manual will save time batteries, but this is where you need the torch with DSLRs.

Be prepared to change your plans

It's not quite the same place as it is in daylight, so the best laid plans may not be feasible at 4am. I was planning to photograph a much deeper darker part of the wood but it was too dark to see what I was shooting - perhaps I be braver next time!

Experiment!

Set yourself something new to tryout. If you're out close to home you can always try something else next time (but perhaps not the next morning at 4am). And most importantly - have fun!

4am: Me and Hemmingway's Bench

Thursday, March 25, 2010

An Impossible Dream made Possible

Stocks of Polaroid instant film are now dwindling, but The Impossible Project, having taken over the last Polaroid production plant in 2008, have today started selling their first instant films. Interestingly they are black and white and one, PX100, is in SX70 format which never existed in black and white when made by Polaroid. I still have an SX70 camera somewhere so I might give this new film a try (I never thought I'd say that ever again).

Friday, March 19, 2010

Hipstamatic film & lens combinations test

I have been testing every combination of Hipstamatic lens and film, you can buy with version 150, in a none too scientific way. Iwas bored waiting for the next tube train to Leicester Square, so I started taking pictures of the London Underground roundel logo tiles at Highgate station. Being red and blue on a white background this was hardly the best colour chart to test, and certainly not under optimal lighting conditions (hence the blur). However it has given me a set of reference images that will help in predicting, to some degree, the possible outcome of my choice for any shot.

For those who don't know how Hipstamatic it is not like other iPhone photo apps in that you take a picture with a choice of "lens", "film" and "flash" to apply a set of transformations upon the image. There is no post-production processing choices and you cannot change your mind afterwards. This is fine if either you are happy with the randomness of applying creative filters (you can shake the phone to allow Hipstamatic to choose the film and lens) or you know what effect your choices will have on the pictures, so hence this little project [1].

Hipstamatic Test - raw
The plain vanilla London Underground tile

So here they are 48 (+ 1) pictures of the same thing - 6 lenses and 8 films. I have not included the flashes in the test as this would have taken many delays on the Norther Line to complete [2]. The plus one is the standard shot (above) taken with the default iPhone camera, no post process, except cropping to square format, and otherwise taken in the same non-scientific manner. I've grouped the pictures both by lens and by film, and you can click through to the full-size image in my test set on Flickr

The Lenses

Lens: John S

Hipstamatic Test: John S + BlankoHipstamatic Test: John S + Ina's 1969Hipstamatic Test: John S + Kodot VerichromeHipstamatic Test: John S + BlacKeys B+W
Hipstamatic Test: John S + BlacKeys SuperGrainHipstamatic Test: John S + Alfred InfraredHipstamatic Test: John S + PistilHipstamatic Test: John S + Float
One of my favourite lenses and especially in use with Kodot Verichrome film. This one comes with the basic Hipstamatic.

Lens: Jimmy

Hipstamatic Test: Jimmy + BlankoHipstamatic Test: Jimmy + Ina's 1969Hipstamatic Test: Jimmy + Kodot VerichromeHipstamatic Test: Jimmy + BlacKeys B+W
Hipstamatic Test: Jimmy + BlacKeys SuperGrainHipstamatic Test: Jimmy + Alfred InfraredHipstamatic Test: Jimmy + PistilHipstamatic Test: Jimmy + Float
Jimmy seems most useful for lightening images and increasing contrast when used with the black and white films BlacKeys B+W and BlacKeys SuperGrain

Lens: Kaimal Mark II

Hipstamatic Test: Kaimal Mark II + BlankoHipstamatic Test: Kaimal Mark II + Ina's 1969Hipstamatic Test: Kaimal Mark II + Kodot VerichromeHipstamatic Test: Kaimal Mark II + BlacKeys B+W
Hipstamatic Test: Kaimal Mark II + BlacKeys SuperGrainHipstamatic Test: Kaimal Mark II + Alfred InfraredHipstamatic Test: Kaimal Mark II PistilHipstamatic Test: Kaimal Mark II + Float

Lens: Helga Viking

Hipstamatic Test: Helga Viking + BlankoHipstamatic Test: Helga Viking + Ina's 1969Hipstamatic Test: Helga Viking + Kodot VerichromeHipstamatic Test: Helga Viking + BlacKeys B+W
Hipstamatic Test: Helga Viking + BlacKeys SuperGrainHipstamatic Test: Helga Viking + Alfred InfraredHipstamatic Test: Helga Viking + PistilHipstamatic Test: Helga Viking + Float
I particularly like this lens with Float film, but I also use it with Ina's 1969, Kodot Verichrome and the BlacKeys films.

Lens: Lucifer VI

Hipstamatic Test: Lucifer VI + BlankoHipstamatic Test: Lucifer VI + Ina's 1969Hipstamatic Test: Lucifer VI + Kodot VerichromeHipstamatic Test: Lucifer VI + BlacKeys B+W
Hipstamatic Test: Lucifer VI + BlacKeys SuperGrainHipstamatic Test: Lucifer VI + Alfred InfraredHipstamatic Test: Lucifer VI + PistilHipstamatic Test: Lucifer VI + Float

Lens: Roboto Glitter

Hipstamatic Test: Roboto Glitter + BlankoHipstamatic Test: Roboto Glitter + Ina's 1969Hipstamatic Test: Roboto Glitter + Kodot VerichromeHipstamatic Test: Roboto Glitter + BlacKeys B+W
Hipstamatic Test: Roboto Glitter + BlacKeys SuperGrainHipstamatic Test: Roboto Glitter + Alfred InfraredHipstamatic Test: Roboto Glitter + PistilHipstamatic Test: Roboto Glitter + Float
Worth looking at the full-size versions of these images as these thumbnails don't do justice to the effect.

The Films

Film: Blanko

Hipstamatic Test: John S + BlankoHipstamatic Test: Jimmy + BlankoHipstamatic Test: Kaimal Mark II + Blanko
Hipstamatic Test: Helga Viking + BlankoHipstamatic Test: Lucifer VI + BlankoHipstamatic Test: Roboto Glitter + Blanko

Film: Ina's 1969

Hipstamatic Test: John S + Ina's 1969Hipstamatic Test: Jimmy + Ina's 1969Hipstamatic Test: Kaimal Mark II + Ina's 1969
Hipstamatic Test: Helga Viking + Ina's 1969Hipstamatic Test: Lucifer VI + Ina's 1969Hipstamatic Test: Roboto Glitter + Ina's 1969

Film: Kodot Verichrome

Hipstamatic Test: John S + Kodot VerichromeHipstamatic Test: Jimmy + Kodot VerichromeHipstamatic Test: Kaimal Mark II + Kodot Verichrome
Hipstamatic Test: Helga Viking + Kodot VerichromeHipstamatic Test: Lucifer VI + Kodot VerichromeHipstamatic Test: Roboto Glitter + Kodot Verichrome

Film: BlacKeys B+W

Hipstamatic Test: John S + BlacKeys B+WHipstamatic Test: Jimmy + BlacKeys B+WHipstamatic Test: Kaimal Mark II + BlacKeys B+W
Hipstamatic Test: Helga Viking + BlacKeys B+WHipstamatic Test: Lucifer VI + BlacKeys B+WHipstamatic Test: Roboto Glitter + BlacKeys B+W
Perhaps the most useful comparison of lens effects with a film is with black and white films as there is a much more subtle difference in choice of lens.

Film: BlacKeys SuperGrain

Hipstamatic Test: John S + BlacKeys SuperGrainHipstamatic Test: Jimmy + BlacKeys SuperGrainHipstamatic Test: Kaimal Mark II + BlacKeys SuperGrain
Hipstamatic Test: Helga Viking + BlacKeys SuperGrainHipstamatic Test: Lucifer VI + BlacKeys SuperGrainHipstamatic Test: Roboto Glitter + BlacKeys SuperGrain

Film: Alfred Infrared

Hipstamatic Test: John S + Alfred InfraredHipstamatic Test: Jimmy + Alfred InfraredHipstamatic Test: Kaimal Mark II + Alfred Infrared
Hipstamatic Test: Helga Viking + Alfred InfraredHipstamatic Test: Lucifer VI + Alfred InfraredHipstamatic Test: Roboto Glitter + Alfred Infrared

Film: Pistil

Hipstamatic Test: John S + PistilHipstamatic Test: Jimmy + PistilHipstamatic Test: Kaimal Mark II Pistil
Hipstamatic Test: Helga Viking + PistilHipstamatic Test: Lucifer VI + PistilHipstamatic Test: Roboto Glitter + Pistil

Film: Float

Hipstamatic Test: John S + FloatHipstamatic Test: Jimmy + FloatHipstamatic Test: Kaimal Mark II + Float
Hipstamatic Test: Helga Viking + FloatHipstamatic Test: Lucifer VI + FloatHipstamatic Test: Roboto Glitter + Float
I love the through the viewfinder effect

[1] It is a lot easier with other creative iPhone apps to demonstrate the different outcomes with post-production transformations on any one picture.

[2] There are 288 possible combinations of flash, film and lens for all available add-ons for Hipstamatic 150

Labels: , , , ,